Thursday, March 16, 2017

Rain, SHB, Rain, Super and Rain.

G'day everyone.

Did I mention rain? Its been very wet here in South East Queensland, since the weekend it has rained pretty much constant until late yesterday evening and although today is predicted to be clear, as of tomorrow (Saturday) its supposed set in each day for at least until mid next week. Not that I'm complaining, we need the rain in this part of the world but it has made my beekeeping beginnings a little awkward. To start, I left the bees 2 weeks from the last inspection, so on Saturday again I had a look while my daughter helped out for the first time. All seemed well but in lifting the inner cover the amount of Small Hive Beetle there was startled me. There was probable 10 or so on the mat, I'm not sure yet if that's something to worry about or not with still being so new to all these issues. I do use traps, 2 AJ traps per box and a reusable DE (diatomaceous earth) traps shown below.
AJ Trap with DE.


AJ Trap.


DE Trap.
Originally I used DE in the AJ traps, I research and found they were meant to have vegetable oil in them to drown the beetle. I also read though that people used DE as it is effective and didn't go everywhere when trying to install or remove them from the hive. When I had them in after the hive was initially installed it seemed to work well, but was told that maybe oil would be better so I gave it ago. I'm  not saying it doesn't work, but the mess of trying to get it in the trap then install it or remove it was quite the pain. There were a fair few in the traps but I found they were running dry anyway where as DE doesn't "run out". What DE is, is basically microscopic crushed up coral that acts like razor blades to the gaps in an insects exoskeletal plates and also dries them out, yet is perfectly safe to humans. The DE traps sit on the bottom board and is designed for DE. I have decided to go back to DE for the AJ traps.

After checking the hive I decided they were ready for a honey super, I found they had all frames full and covered in bees. So I put that on with a Queen Excluder, and before I put the lid on I found a bunch of SHB in the corner of the lid, circled by bees guarding them, this is what bees do, they push them into a corner and keep them there, that's how traps work, the beetle try and hide in them to get away. I thought it was amazing and super cute when a bee chased a runner SHB back into the herd. I used my hive tool to crush them all before replacing the lid.

So that's where the rain comes in, that night, the weather report came in with rain. Great! not... I still am not sure if rain is getting in the hive or not. This is a bad thing with the bottom board traps, especially if you use poison based ones, but more on that later. With solid board hives you lean the hive forward slightly so the rain runs out, problem is, how much do you lean it, the only real advice is not too much.... how long is a piece of string? I don't know, I had around 2cm at one point but worried this was too much, so backed it off to around 1cm at the front. I then kept worrying again about the amount of SHB, and decided to go what most of the club use and that's Apithor traps, a poison style trap. Problem with them is that they are poison, so must be kept away from water, or it will run out of the trap and effect the bees. Our president puts his on top of the frames in the hive but at the last meeting it was explained how this isn't as effective and could get into the frames themselves. so whats the option? stop the rain getting in the hive.


First the Apithor Trap, it was developed after what many keepers DIY'd, they often used core flute board with poisons inside the holes and put it in the hive, put small holes in a CD case to do a similar thing, well this works both these ideas, it has poison covered wavy cardboard in it that is appitising to SHB and a hard shell exterior with a small slot for the SHB to go into. Put it on the bottom board, the SHB go in through the entrance and get chased straight away into the trap. There they eat the poison they cant resist and die quickly.

But still what about the rain? Well I had originally worried about the rain when thinking the lean was not enough, due to moisture in the hive not being an ideal situation, but it run out quickly enough to not become a problem. My thought was a roof, on top of the hive, which I made cheaply out of strap sealed ply and foam, its sticks out enough to stop light rain but its mostly to keep them cooler on really hot days. On heavy rains, wind blown rain or storms the rain would still get in due to the fact this roof would be way to high from the entrance. So I thought originally an awning or patio style shield, which is what I made, out of scrap tin sheet, and 16x16x 25mm pine. I put this at what I felt was a good height to keep rain out but enough to not get in their way while landing, and the few that do miss judge will land on it and climb down anyway, they get into much trickier spots in the wild. It all cost maybe $2 for 2 of them, and took only 10 minutes to make. This will stop the rain getting in and allow the use of an Apithor trap

Simple, yet effective. Even if using 10, 50 or 100 hives, this could be a cost effective way to keep out water and use Apithor traps. All just in time for the impending downpour coming!
 
Cheers
Wayne


Wednesday, March 1, 2017

Honey extraction on the cheap!

Hi all

Today I would like to show you a way to get good quality, yet cheap equipment for honey extraction. Firstly this week I have been a bit sick, and very busy, yet was able to do some of the DIY work during this time, so its quite easy to do.

If you are here on this page then you probably know some of the very basic things you need for extraction in what ever method you choose, be it crush and strain, gravity only or extraction machine that spines the honey out of the frames (leaving the Flow hive system out of this section). I have chosen the latter and more common honey extraction that uses a honey extractor, which spins the honey out of the frames, but more on this later. Firstly lets go over some basic equipment,for crush and strain, basically you cut the comb out of the frames in to a bowl or dish, mash it down with a large spoon or similar and then strain the honey through filtering. This is fine,but wastes the comb (wax), there are arguments for and against, some say its healthy for bees to make more wax, others say its not, I sit on the fence for most things like this so I go with what I feel. What you need is 2 buckets of food grade quality to put the crushed honey into, the top bucket has holes in the bottom and a mesh net to strain the honey and the bottom then collects it. Ill post some videos from some great Youtubers for this example.

Bee Vlog original set up.
Bee Vlog Modifications Part 1
Bee Vlog Modifications Part 2
Mahako Bees crush and strain tips.

Ok so thats crush and strain, not too bad, what about if you want to keep the comb intact? well theres 2 ways I know of, both you must remove the cappings (what the bees cover each cell once the honey is of the right moisture content) you can do this with long fillet knives, serrated bread knives, or purpose made uncapping knives that are serrated, or come with the ability to heat the blade up through an electrically powered heating element inside the blade or even steam. These make it much easier.

You may also need an Uncapping fork, this helps remove the caps that the knife cant get. I got mine in my initial package from Iwoohoo Beekeeping online, link below
http://beekeeping.iwoohoo.com.au/
I do intend on getting an electric knife at some point, that way I have to uncapping knifes at one time, hopefully shortening the time in that area.

One way to then get the honey out, is the gravity way, I have only found a little about this method as its slow and not used much anymore. I read that it was supposedly the method used by people before extractors were made. Basically you put the frame face down over a tub in a warm protected area for some time to let the honey dribble out, then flip it over to do the other side of the frame. This sounds very time consuming to me, I could imagine it being a long time with just 10 frames but say you have 20, 30, even 50 or more hives full of at least 10 frames each.... Eeekk! It would probably take up a lot of room to make it a little quicker by doing as many frames as you can at once. But if you are starting out, with a few frames, it may be a good way to get that first honey harvest done.

The most common, and by far easiest and less destructive way is by using an extractor. These are large drums that have machinery in it that spin a certain amount frames to use the centrifugal force to push the honey out of the cells. They can be hand driven, or electrically driven via a motor, they also come in different grades of construction and from plastics to stainless steel. The other things to look for is how many frames it can spin at once, they start at just 2 at a time which is perfect for a beginner, or just around the 1-4 hives, so I have read is recommended, yet I have seen people using just a 2 frame hand crank extractor do well over 100 hives and get it done in one day! They do come in more, such as 3, 4, 6 all the way up 20 frames and more!

Another thing too look at is how the spinner works, Im talking about whether it Tangential or Radial. Its not a huge issue I believe, one spines with the faces of the frames toward the wall of the extractor (Tangential) the other has the frames on edge (Radial).
Can anyone tell me what the difference is? WRONG....I mean RIGHT! ummm I cant actually tell what you might have thought so hrrmm sorry. Basically Tangential means you will have to flip the frames around and spin again as it only does one side at a time, Radial does both, basically the jist of it! Does it matter, ahh no not really, I mean go with what you want.

So what did I go? Well I was going to just hire the clubs one, reasonable price but I have a thing about not having my own, but to be honest local bee supplies have then starting at at $400 for just a 2 frame plastic extractor.... YOUCH! They then go up into the thousands depending on what number of frames, drive power and material they are. I found some online from brick and mortar stores around the country that are plastic 2 frame for around $190, still a bit steep for a plastic bucket and a wire basket.

So did I DIY my own? no, I found the effort and cost was not worth it here for me anyway, I know I wouldn't be able to hold the the machine in balance too well and didn't trust the metals I would have to use, but there are plans online if you wish to give it a go, I know I was close. I found a machine on eBay
though, good price, stainless, 2 frame, well built and can even come in sizes of around 3-4-6 frames, I went this way because one day I may wish to upgrade in size and I can just donate this one to the club when I do. A steal at $130 with a 10% discount, plus basically getting 2 honey gates free (more on them later). Here's the extractor:

Now onto another part, its not necessary but I really wanted one, its called an Uncapping Tank. Basically they are 2 food grade containers that sit on top of each other, the top one has a mesh bottom.


What you do is put the the frame on the screw on that wooden cross piece, this allows you to balance and turn the frame when uncapping, the cappings fall into the container with the mesh and the honey then drains down into the bottom container, which you can drain into your honey storage via the honey gate scene in the picture. Its basically a giant tap/plug for honey to flow easily.
I have tried to make my own, due to the fact they start at $160 from local bee supplies :O gasp! I made my first attempt from spare storage containers I had from cheap stores (such as the reject shop here in Australia)


The idea was simple, saw others try it online too, drill some holes in one containers bottom, uses a mesh or fly screen and then add some wood across the top of the bottom container to hold it all up. and another with a screw that would be the frame rest. This was fine, but to be honest I just couldn't handle that it wasn't food grade. I wouldn't leave it outside and I thought I wouldn't keep the honey in there long but it would still be long enough so I scrapped it.

I then decided to get my supplies from Bunnings (large Australian hardware chain), I knew I could get all I needed from there. I grabbed 2 54L food grade fish storage containers, the type the trawlers use to keep their catch in, I also grabbed just one lid that fit them, a piece of aluminum fly screen mesh as its stronger and safer to use then fiber glass mesh. I also grabbed 12 stainless steel bolts. I cut out the bottom of one contain and cut a piece of mesh out to the correct size and attached it the container floor via the stainless bolts. I still had the 2 supports from the first attempt but whats awesome is that these boxes can be switch around directionally and either fit inside one another or stack on top, so using these 2 supports made from left over 4x2 used in the bench build I added a screw to each and now have 2 frame holders for 2 people to use at once. This all cost me a total of $60 and is larger then store bought and I have plenty of things spare, especially mesh. I do have honey gates on the way, one to add to the bottom container and the other for my 20L bucket. Here's the pics:


I also ordered a strainer, theres a million types that are beekeeping specific, all expensive locally though, from plastic to steel ones that look like the meshed kitchen ones, which I would say you can use. I wanted one that would fit the bucket, so went for the double layer steel type that has and adjustable bucket bracket. Again, ebay is mine, and your friend, just make sure you check descriptions and use paypal!

So thats been my week in the apiary, hope this helps some of you, just remember, you get what you pay for, but not as most people think, sometimes the cheaper priced items last better the expensive ones, you just have to way up the options that suit you best!

Cheers

Thursday, February 23, 2017

Nuc box as an observation hive? Yes!

G'day everyone

So I'vebeen wanting an observation hive, as it was suggested to me that they are a great learning tool. I have been trying to find good plans for one, and there are some, but they are normally large indoor style like this or similar-
Or an Ulster type that is basically a 3 frame Nuc boc with a glass frame holding lid, like this-
There are heaps of other types too, I think the skys the limit with it to be honest. I know here in Australia it would have to be framed for legal reasons. The indoor type doesnt suit and I was considering the Ulster type but felt viewing is limited and I would like to have a minimum of a 5 frame box for the bottom and would lose all that activity. I knew it would most likely be in the back yard and so I decided that one of my already made boxes would suffice. I simply took a sheet of A4 sized acrylic I had and measured 10mm in from that and cut out 2 walls of the box. I then added simple pivot latches and dowl handles and screw the acrylic on the inside wall. I did have to order another sheet of acrylic since I only had one so that should be here soon. I will either use the box as a nuc still or I may make it a permanent mini colony. If I do Ill add a second box on top and do a similar thing.


Cheers

Monday, February 20, 2017

A beezy week!

Hi all!

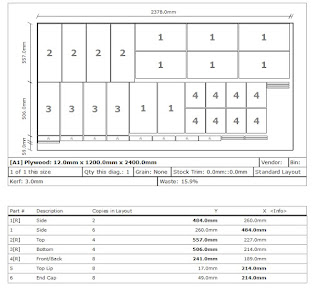
This last week has been a busy one for the bees, firstly I spent my week building some nuc boxes. Yes I know I made a Nuc box out of a polystyrene fruit box but I really wanted something smaller, more manageable, strong and more universal. Plus I also wanted to get my hands dirty and build something, especially after finally discovering what I felt was the best plans to build them, incorporating simplicity, cost effectiveness, and of course, able to be built in metric for Australian materials. I went with the Coates plans, available online, but the issue is that it asks for 1/2 inch ply, we here in Australia can only get 12mm (metric) generally. I could have just used the imperial measurements on the 12mm ply but the issue is it would change the interior size of the box, and over all the bee space, so not only would the frames not fit, the bees wont use the frames effectively. So I went looking for metric conversions, I found only really one small source where a someone had converted all the measurements to size but didnt take into account the difference the 12mm ply will make on the internal measurements. Using Cut List Express I worked out all the new measurements and set up battle plan for the task ahead. It took my only 1 day over all to build them, what is great about these plans is you get 4 boxes from 1 sheet of 2400mm x 1200mm ply (12ft x 6ft). I intended to paint them with Taubmans exterior paint but Kristy (wife) grabbed the wrong colour, thinking it was white, it even looks white, well looks like something I dont want to say on here, but when painted it becomes clear. So I used enamel paint, which is great, but takes a lot longer to dry. I made some simple straps from scrap tie down strap material. I will also be donating one to my local club meeting raffle for all the help they have given me so far.

The other thing I did in the last week was my first inspection of the hive! It was a bit scary, I was a little overwhelmed so I tried to slow down and look well. I saw no sign of issues like disease, or invaders. Mild Small Hive Beetle (SHB) were present but the only trap installed using diatomaceous earth worked well. So I removed the first 2 frames from one side, going from pollen and nectar storage to more brood as I went in, I was surprised how much had changed. As I went along I worried I wouldn't find the Queen but I did on the 7th frame, she was beautiful, I put her in a cage and set her aside for marking. During this point I noticed a lot of activity out the front of the hive, and we all saw bees fighting, I picked up on the fact it was some other hive bees coming in to rob Hive Alpha. I decided to speed up, I checked the last frames and saw the brood fade off into nectar, I then got ready to mark the queen. I put her in the marking cage and got her to line up, painted her back yellow for the 2017 year and checked her over. I let her sit for a minute and then placed her back in the hive and close it up. It was then I wondered about adding the honey super, I went by the 80% brood rule and felt it was close enough, so quickly prepared that and also got some more traps organized. I used some more AJ traps, but this time trying oil and vinegar in those and DE in the floor traps. I placed on the queen excluder and honey super, while keeping an eye on how the girls treated the queen. All seemed well so I sealed it off and checked the robbing situation. That had all come to an end but the bees seemed fairly annoyed now, so I left them alone.

Later that day though I thought I would check them, Ive gotten use to a guard be checking me out but one hit me hard from 10ft away this time, I started to back up and wondered about getting my suit but it was too late, she went behind me and as I turned she stung me on the under side of the arm...OUCH!

Other then that all has been good. next time I hope to show you my water supply for the bees and what I have done for it.

Cheers

Saturday, February 11, 2017

Beeyard Bench.

Thought I would do a quick blog to show you this little bench I built for inspecting and such of the hives. Basically followed what Bill does on his youtube vlog, here's the link to that video, follow his links from there! Differences are minor, I used 70x35mm for the wood all round, and being in Australia it also comes in metric so I used the main beams cut to 1200mm, the rest is the same in imperial.
Cheers

We have bees!

So last night the family and I went to go pick up and bring home our first hive from its nuc install site. All seemed well, and we drove them home and placed straight onto their new location. Since its 41°c here yesterday they didnt take long to start bearding outside the entrance. I followed the local clubs idea of raising the bees to 30cm off the ground to get away from the cane toads but they were sitting under the hive in minutes waiting for them to get low enough or fall to their open mouths. I am going to get 2 more blocks and raise them to around 50cm off the ground to be sure they cant get them. Here is the finished entrance vent I used, it was ok but I think ill go another type I made which used a length of plastic queen excluder and fly mesh.
I woke up early this morning so I could watch the bees activity and watch them do their orientation flights. They have been doing that for a couple of hours now and becoming more active. Today is supposed to reach 43° so I will have to see how they go. They get morning sun until around 10 and then shade the rest of the day in summer, which is what is recommended for my local area.

I have called this Queen, Queen Selene, of hive Alpha.
Here are some photos of them doing their thing.


Cheers


Tuesday, February 7, 2017

DIY Transport hive entrance vent.

Ive been wondering since I dropped off my hive to have my nuc installed into my hive the best way to seal the hive off for the return home. It will be in my Ford Falcon wagon so the bees will need to be well and truly locked in well. I thought of a simple stick across the entrance, I have plenty of 18x18mm lengths laying around from another project, but obviously that could be bad and would seal the hive completely with no air for what maybe an hours drive. I then thought of just taping fly screen mesh over the entrance with masking tape, easy problem solved I have plenty of that lying around from snake enclosure vents I make. But my mind kept running, what about an easier, cleaner looking faster way to do it that's a bit more universal? Then it clicked, I can make a frame for the fly screen mesh out of the 18mm lengths. I realized the bottom length would have to be left out as it would obviously cover the entrance, so I figured if I cut the mesh bigger then the frame it could fold out and be held down by a single piece of tape. So here it is:
 The frame is made from the lengths cut to just longer the they entrance, then 2x 30mm long pieces are cut for the downward pieces and nailed together with just some hive frame nails. The mesh is then stapled onto the back and toward the front.
Ive been thinking while typing this to make a bottom piece to the frame at 90 degrees to eliminate the need for tape as well. Screws are used in the same spots on all the vents to make it easy to remove from one hive to another.

Cheers

Monday, February 6, 2017

Welcome!

Welcome to my beekeeping blog! My name is Wayne Clark and I am a newbee beekeeper, I wanted to make a blog (my first one) to document my journey as a learn and grow in the world of bees.

Firstly a little about me, I am a photographer and stay at home dad. I have qualifications in IT and construction. I have a beautiful wife Kristy who is a Veterinary Nurse and an amazing little girl Kaitlyn who is about to turn 10. My other hobbies include and have included, RC models, Archery and fishing. I also own a 1955 Morris Minor convertible that has been getting restored for the last 18 months and belong to the Morris Car Group of Ipswich.

So what got me started in bees? Well to start, when I grew up around SE Queensland I always saw and took notice of bees, both European honey bees and Native Sugarbag bees. I split time up on properties closer to Brisbane and Aratula/Boonah in my earlier child hood before moving to Ipswich. I live only 100 meters from an abandoned coal mine that is now a giant bush acreage, we had clover flowers and bees everywhere here also, but in recent years noticed the bee population become pretty much non existent, with only the odd bee going near our lavender plants. The media then also come on board with the obvious implications that had been discovered by their decline. In the last 2 years or so I had been thinking about what I could do to take part in helping our bee friends, I was thinking of just keeping natives and setting up homes for native solitary bees. It was in January during the holiday break that the family went to the Buderim Ginger Factory in Yandina, there they have a display the and show on bees, both honey and native. I spoke to the host of the show (sorry forgot his name), he suggested a book and where to go. It made up my mind, within the week I had my hive on its way.

So I contacted IWMBA club, have joined them, I also ordered a complete starters packack from iWoohoo Beekeeping in Sydney. Why I went with theres was mostly price, I looked at the quality, and felt that for the little it lacked in looks it was still well in price, 2 solid deep 10 frame boxes, lid, 20 frames, wire, foundation, suit, hive tool, smoker, wiring eyes, bee brush and wiring hardware. I do get my other gear though from Quality Beekeeping at Sumner Park (www.qualitybeekeepingsupplies.com..au). I then went on the look out for a nuc, I could have gone through the club but it may have taken a while, but I found one through the Flow Hive forums. Its being split checkerboarded so I keep my own frames. Hopefully they will be home in a week! heres how they started on night 1 and a few days later.

The numbers are my HIN, the large A is for Alpha, Im going to be using Greek alphabet for my hive organization. Hive 1 and 2 will be Alpha and Omega, as in the one from the bible, not due to any real religious reasons, but it sounds good, and in a sense bees are like tiny gods. I have built and prepared hive Omega and it is awaiting a nuc as well.

While waiting for a nuc I planned my way to get native bees, I decided to DIY my own hive, based on the OATH native hive, with of course, some modifications.
It is made from 45mm pine, from an old water bed, the roof is an old microwave panel. It was painted with UV resistant enamel and then decorated by my daughter. A few changes since that photo is a tie down strap, a clear window ceiling for viewing when roof is removed, and a higher stand. It is now at a native beekeeper for having a hive of bees introduced into it.

I hope you come along and join me on my journey, I wish to learn as much as I can but keeping it as simple as possible. Next post I will try and show all my own DIY tools and items such as a nuc box, wiring jig, and foundation embedder.

Cheers


As Promised, some of my DIY haul!

So as promised, here are just some of the things I've made myself.
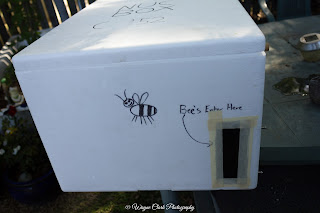
To start with a nuc/swarm box, made from a "broccoli box", which is basically just a fruit shop vegetable box. Its wide enough to accommodate 10 frames, and just was a matter of cutting our the blocks with a sharp knife.
The holes were cut with a heated rod, and used an old curtain rod for the supports. The entrance door is cut our from the front and then wrapped with electrical tape to make it tight when shut. I used 3 inch nails as a hinge point and a locking pin. I also used masking tape to be triple sure.


Bonsai wire used as a split pin to hold the dowling/curtain rod.
10 frames fit in comfortable, in here I'm going foundationless, just using simple wax starter strip and wires for comb support. The foam blocks come from the rear ventilation hole in the back of the box shown down below, they are used to keep the frames up tight against each other to stop moving during transport.


The rear ventilation is just a hole as stated above and a piece of fly screen cut to size and tapped on. I also used staples from a staple gun under the tape to be sure though.
Here is the wiring jig, sorry the photo is blurry, the clamps are bolted on under the board, 2 plates of mdf are to keep the frame level. On the right hand side the wire is held on with 2x 3inch nails and to keep it from unspooling a small nail to wrap the wire around it. Up from there are 2 dishes that are for holding the eyes used in the frame to protected the wood from the wire and tack nails to hold the wire on the frame, I use a separate dish to hold the wire cut offs. Tools in the center, more on them below. The container in the back holds all the nails and pieces to build and wire the frames.
The tools are a small peen or ball hammer for nailing the tacks down and frame nails, a broken precision screwdriver (broke making the first lot of frames) is there to tape down the eyes into the wholes in the frames and also hold the wire in place when being tightened. The pliers are to pull and leverage the wire to make it tighter, to stop it cutting and snapping the wire, I filed the tip down on the inside and outside edges to make it more rounded, so best to use cheaper pliers for this.

Ill show later how all this works and also my foundation embedding tool.

cheers